The welded connections are solid, non-detachable connections based on the principle of local melting of connected parts using heat or pressure. The joining of components proper may be achieved technically using two methods:
- Fusion welding (arc, flame, plasma, laser, thermite, electroslag, ... welding)
The weld is a result of local melting of the material of connected parts, and usually also filler metal, without pressure.
- Pressure welding (resistance, induction, ultrasonic, friction, explosion, ... welding)
After melting in, the components join in the contact spot using mechanical pressure or impacts.
An optimum result of the welding process should be a weld with mechanical properties similar as far as possible to the properties of the basic material. According to their function, we can divide welds into:
- Force welds - load-bearing welds used to transfer external load
- Tack welds - welds providing only compactness of the whole (with no or negligible external load)
- Caulk welds - welds providing staunchness of connected parts (vessels, pipelines, etc.)
Butt welds.
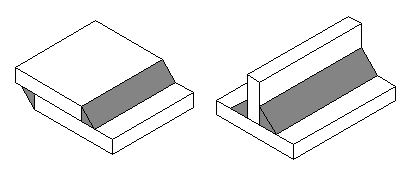
Butt welds originate in the joint gap of connected parts and are usually used as load-bearing, force welds. In order to achieve perfect workmanship of the welds, it is usually necessary to perform modification of the contact surfaces of the connected parts. The method of welded surface treatment is set by the workmanship of the connection, the thickness of the welded parts, the welding method and the accessibility of the welded spot.
When designing and performing the strength checks of welded connections, the weldment with a butt weld is considered as a solid component with a dangerous spot in the area of the weld. The load-bearing weld section will be the basic characteristic of the connection for the assessment of its load-bearing capacity.
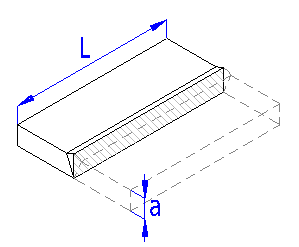
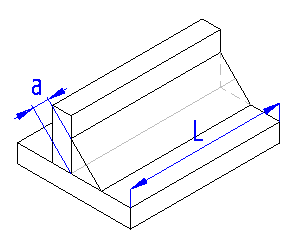
In the calculation of butt welds, the type of welds (method of weld surface treatment) or potential weld root reweldment are not considered. The load-bearing section of the butt weld is then specified only by its thickness "a" and length "L".
Weld throat thickness:
In order to specify the load-bearing section, the thickness of the thinner of the welded parts is considered as the butt weld throat thickness "a". Reinforcement of the weld surface and root is not considered.
Effective weld length:
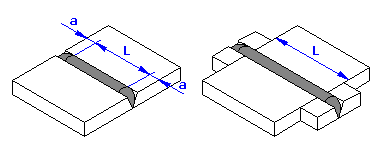
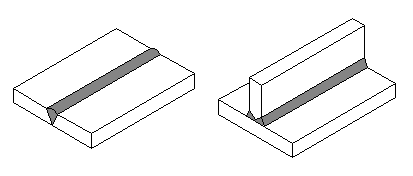
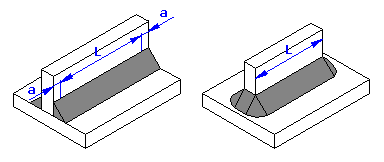
In a normal type of weld, so-called "end down-slopes" are formed. They result in weakening of the section at the weld's beginning and end. The effective weld length will then be smaller than the actual length (reduced by a worse-quality weld beginning and end). For more accurate calculations, we therefore recommend controlling the load-bearing capacity of welds only for that part (length) of the weld that has a rated section. The common method of setting the effective length "L" for common weld execution (fig. a) and specially treated welds (fig. b) is described schematically in the picture.
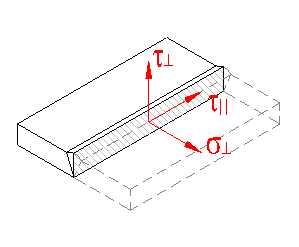
Strength solution of welds:When performing strength checks of butt welds, the rated stress in the load-bearing weld section must be specified first. Depending on the respective load, the individual stress components are specified in the direction normal to the weld (^) and in the direction parallel to the weld (ll). The calculated rated stresses must not exceed the values for the permissible stress.
When specifying permissible stresses, the anisotropic properties of the material in the area of the weld must be considered. Different properties of the material result in differing values of permissible stress of the weld in the normal and parallel direction.
For connections stressed by combined load, the resulting "equivalent" stress in the weld is specified from the relation:

which for sll= 0 can be adjusted as:

The following table specifies the relations used in the calculation of rated stresses (for respective load and workmanship of the connection):
| Load | Rated stress [MPa, psi] |
Tensile/Press.
|  |
Shear
|  |
Bend
|  |
Bend
|  |
Twist
|  |
Tensile
| 
|
Tensile/Press.
|  |
Shear
|  |
Bend
|  |
Tensile/Press.
|  |
Shear
|  |
Bend
|  |
Twist
|  |
where:
a .... weld throat thickness [mm, in]
Aw ... weld throat area [mm2, in2]
D .... tube diameter [mm, in]
d .... weld angle [°]
F .... acting force [N, lb]
Fn ... normal force [N, lb]
Fs ... shear force [N, lb]
L .... effective weld length [mm, in]
M .... bending moment [N mm, lb in]
s^ ... normal stress vertical to the weld direction [MPa, psi]
sll ... normal stress parallel to the weld direction [MPa, psi]
T .... torque [N mm, lb in]
t^ ... shear stress vertical to the weld direction [MPa, psi]
tll ... shear stress parallel to the weld direction [MPa, psi]
Zw ... module of weld section [mm3, in3]
Connections with partly welded welds:Connections with partly welded butt welds are usually handled as fillet welds, with the weld throat (effective) thickness "a".
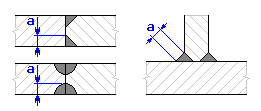 The other, less appropriate solution method applies to the use of the normal calculation of butt welds with the weld throat thickness "2a" and adequately increased safety degree.
Connections with combined welds:Connections with a combined butt and fillet weld are usually handled as butt welds with the weld throat (efficient) thickness "a".
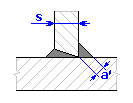 Weld throat thickness:
 where for:


Connections with intermittent welds:
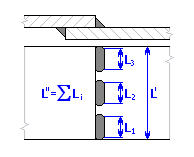
This program is not primarily modified to handle connections with intermittent weld. Therefore use the following steps for their calculation:
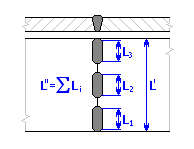 1) Uncheck the switch on line [2.6]
2) For welds loaded only in one direction (subject to tension or shear), check the connection for the effective weld length L=L''.
3) For connections stressed by bend, twist or combined load, check the connection for full weld length L=L', while the required weld safety must be multiplied by the ratio of lengths L'/L''.
Fillet welds.
Fillet welds are located along the wedge-shaped edge of connected parts and their basic cross-section includes an isosceles rectangular triangle. They are usually used for load-bearing, force welds in T-shape connections, cross-butt connections, angle connections and for lap joints. The welded parts do not need shape adjustment. For statically loaded connections, usually a flat weld is used, while a concave weld is more appropriate for dynamically loaded connections, as it has lower notch effects.
In strength checks of fillet welds, the rectangle lying in the centre plane dividing the weld section into two identical parts is considered the dangerous (load-bearing) weld section. The dimensions of the load-bearing section of a fillet weld are specified by its thickness "a" and length "L".
Note: This program is designed for the calculation of welds with uniform fillet welds. The recommended methods of handling connections with intermittent welds or with combined welds can be found at the end of this chapter.
Weld throat thickness:
The fillet weld throat thickness "a" is defined as the height of the biggest isosceles triangle inscribed into a weld section without penetration.
Recommendation: The fillet weld thickness is chosen depending on the used material and thickness of the welded parts. As the information regarding the recommended weld thickness given in the literature differs significantly, follow the company procedures in choosing the weld thickness. In order to specify the approximate minimum thickness of the fillet weld, the following informative relation can be used for the steel strength Rm»370..420 MPa:
 with tmin for thickness of the thinner of the connected materials. For steels with higher strength (Rm»520 MPa), the weld thickness should be approx. 1 to 2 mm higher.
Effective weld length:
In a normal type of weld, so-called "end down-slopes" are formed. They result in weakening of the section at the weld's beginning and end. The effective weld length will then be smaller than the actual length (reduced by a worse-quality weld beginning and end). For more accurate calculations, we therefore recommend controlling the load-bearing capacity of welds only for that part (length) of the weld that has a rated section. A common method of specifying the effective length "L" depending on the weld workmanship is shown schematically in the picture.
Recommendation: The length of the fillet weld should range between 5a< L< 70a. For longer welds, it is more practical to use an intermittent weld. For very long welds (150a<L<400a) stressed in the weld direction, it is necessary, for the sake of calculation, to perform correction of the effective weld length using the coefficient:

Strength solution of welds:
The rated stress specification in the load-bearing section of the fillet weld is an extraordinarily complicated task due to the combined load and more jagged weld. Therefore, a simplified method is used in the calculation for handling fillet welds that reclines the load-bearing weld section into the plane of connection of the parts. Depending on the respective load, the individual stress components are specified in such reclined section, in the direction normal to the weld (^) and in the direction parallel to the weld (ll). This convention also includes an assumption that all components specified like that will actually have a character of the shear stress. The calculated rated stresses must not exceed the values of permissible material stress in shear.
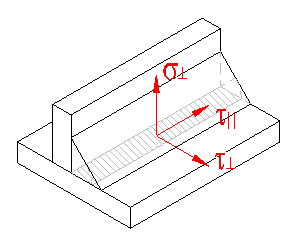
When specifying permissible stresses, the anisotropic properties of the material in the area of the weld must be considered. Different properties of the material result in differing values of permissible stress of the weld in the normal and parallel direction.
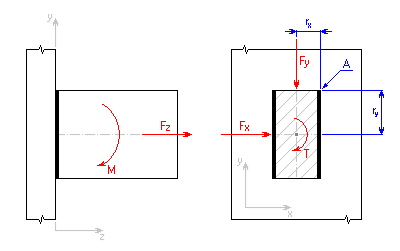
A common method of handling welds with fillet welds is further presented in a typical example of connecting a beam using a double-sided fillet weld.
Depending on the acting load, we can use the following relations to specify the individual components of stress at point "A" of the weld:
- load with normal force Fz:

- load with bending moment M:

- load with shear force Fx:

- load with shear force Fy:

- load with torque T:
 where:
Aw ... weld throat area [mm2, in2]
Iw ... moment of inertia of the weld [mm4, in4]
Jw ... polar moment of inertia of the weld [mm4, in4]
s^ ... normal stress vertical to the weld direction [MPa, psi]
sll ... normal stress parallel to the weld direction [MPa, psi]
t^ ... shear stress vertical to the weld direction [MPa, psi]
tll ... shear stress parallel to the weld direction [MPa, psi]
For connections stressed by combined load, the resulting "equivalent" stress in the weld is specified from the relation:

which for sll= 0 can be adjusted as:

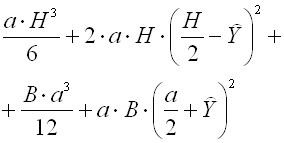
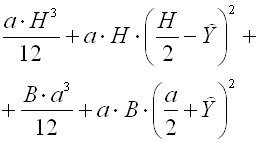
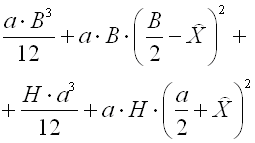
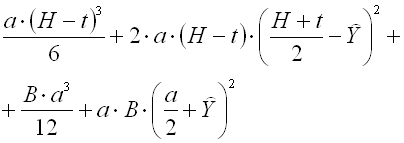
The sectional properties for the selected basic shapes of weld groups can be found in the following table. In order to specify the polar moment of inertia of the weld, you can use the following relation:

| Shape | Aw [mm2, in2] | IwX [mm4, in4] | IwY [mm4, in4] |
 |  |  |  |
 |  |  |  |
 |  |  |  |
 |  |  |  |
 |  |  |  |
 |  |  |  |
 |  |  |  |
 |  |  |  |
| Centre of gravity of weld group: |
 |  | | |
 |  |  | |
 |  | | |
where:
a .... weld throat thickness [mm, in]
B .... width of weld group [mm, in]
D .... weld diameter [mm, in]
H .... height of weld group [mm, in]
L .... weld length [mm, in]
s .... flange thickness [mm, in]
t .... web thickness [mm, in]
Connections with combined welds:Connections with a combined butt and fillet weld are usually handled as butt welds with the weld throat (efficient) thickness "a".
 Weld throat thickness:
 where for:


Connections with intermittent welds:
This program is not primarily modified to handle connections with intermittent weld. Therefore use the following steps for their calculation:
 1) Uncheck the switch on line [3.12, 4.12]
2) For welds loaded only in one direction (subject to tension or shear), check the connection for the effective weld length L=L''.
3) For connections stressed by bend, twist or combined load, check the connection for full weld length L=L', while the required weld safety must be multiplied by the ratio of lengths L'/L''.
Plug and slot welds.
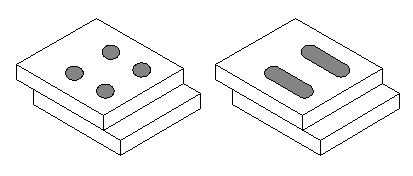
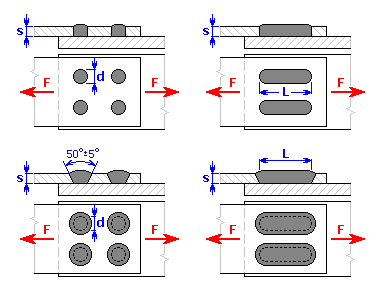
Plug and slot welds are usually used for lap joints. They are not suitable for the transfer of high forces and are especially not suitable for dynamically loaded connections. The connection is formed by the weld on walls of circular or oval openings and in the contact surface of the adjoining part. Plugs and slots of small dimensions are usually fully filled with the weld.
These welds are not suitable for the joining of thicker plates and are usually used for thinner plates up to approx. 15 mm thick. In view of the stress, slot welds are more preferable due to the better quality of penetration of the weld root. A better quality of the weld, i.e. better strength characteristic of the joint, can be achieved by sloped walls of openings.
Recommended weld dimensions:
Hole diameter ... d ≥ 2s
Slot width ... d ≥ 2s
Slot length ... L ≥ 2d
Strength solution of welds:
Two types of damage appear in plug and slot welds:
1) shear in the weld base surface
2) tear in the weld circumferential surface
During strength checks, both possible types of damage must be assessed. We can specify the resulting rated stress from the relation:

Shear stress in the base surface of the weld:

Shear stress in the circumferential surface of the weld:

The sizes of calculated weld surfaces Aw are specified for both weld types in the table:
| Plug welds | Slot welds |
Base area of weld
[mm2, in2] |  |  |
| Circumferential area [mm2, in2] |  |  |
where:
F .... acting force [N, lb]
d .... plug weld diameter, or slot weld width [mm, in]
i ..... number of welds
L .... slot weld length [mm, in]
s .... plate thickness [mm, in]
Spot (resistance) welds.
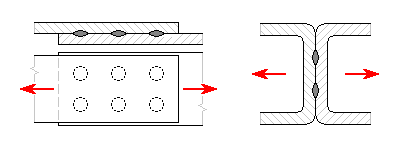
Spot resistance welds are usually used to connect thin plates and thin-walled parts. They are especially very useful in lot production. The connections with spot welds are not very appropriate for transferring high forces. In view of the type of stress, we distinguish two basic types of connections with spot welds:
- connections with welds stressed in shear (lap joints)
- connections with welds stressed in tear (by tension)

In technical practice, not more than 3 parts with maximum total thickness up to approx. 15 mm are allowed to be joined for connections with resistance welds. The thickness ratio for individual parts should not exceed 1:3. The welds should be positioned towards the external force so that they are always only stressed in shear. Spot welds stressed in tension have significantly lower load-bearing capacity, which is why their use is not recommended. Lap welds can be made as single-shear or double-shear. A minimum of 2 and maximum of 5 spot connections should be located in the direction of acting force.
Recommended weld dimensions:
Spot weld diameter ... d » 5 s0.5
Pitch between adjacent welds ... t1 » (2..3) d
Weld distance from edge of plate ... t2 ≥ 2d
Strength solution of welds:
During strength checks, the following checks are carried out for spot welds:
1) Check of weld against tear in cylindrical area
2) Check of weld against shear (for lap joints)
3) Check of weld against separation (for welds stressed in tension)
The calculation is based on the assumption of evenly distributed force F on all welds. We can specify the resulting rated stress from the relation:

Shear stress in the cylindrical area of the weld:

Shear stress in the weld throat area:

Normal stress in the weld throat area:

where:
Awa ... area of the spot weld section [mm2, in2]
Awc ... cylindrical area of the weld [mm2, in2]
F .... acting force [N, lb]
d .... spot weld diameter [mm, in]
i ..... number of welds
s .... plate thickness [mm, in]











 1) Uncheck the switch on line [3.12, 4.12]